
Image size
Set the image size and background. Dimensions exclude the frame. Changing the shape crops the image.
Restore default settings
Choose which settings to reset. Your image, drafts, and recent files stay as they are.
Manage drafts
Restore unsaved work from this device, or delete drafts you no longer need.
No recovery drafts on this device.
Keyboard shortcuts
Welcome to Image Editor
Edit images from your computer or Google Drive for free in your browser. No account needed for files on your device.
Crop, resize, add text, and more. Save to your device or Google Drive, or start with a blank canvas.
Open an image or create a new one.
Edit your Gmail attachment, then save a copy to Google Drive or your device.
Allow access to open the image.
Edit your Google Drive image and save changes to Drive if you have edit access.
Allow access to open the image.
A blank canvas will open. Change its size or background in Tools > Image size.
Recent files
How to use Image Editor
Open an image, make your changes, and save. Here are the basics:
- Open or create an image. Choose Open Image From Computer, Open From Google Drive, or Create New Image. You can also drag an image onto the page or paste from your clipboard.
- Choose a tool. Crop, apply filters, adjust colors, add markup, change the background, add a frame, or redact details.
- Make your changes. The preview updates as you edit. Switch tools whenever you need to.
- Review your edits. Use Undo and Redo to step through changes, or Revert all changes to start over.
- Save your work. Choose Save or press Ctrl+S (Cmd+S on a Mac). Use Save as... for a new file or location.
Open an image from your computer
Select Open Image From Computer, or choose Open from computer... in the File menu. Pick a JPEG, PNG, WebP, BMP, GIF, AVIF, HEIC/HEIF, TIFF, or SVG image; drag-and-drop and clipboard paste work too.
Open an image from Google Drive
Select Open From Google Drive, or choose Open from Google Drive... in the File menu, then sign in and pick an image in the Google file picker. Image Editor asks for access to the files you select or create with the app, not your entire Drive.
Create a new image
Select Create New Image, choose File > New image, or visit imageeditor.app/new. This opens a transparent 1600 × 1200 PNG. Choose Tools > Image size... to change its size, orientation, or background.
The Image Editor workspace
Choose a tool beside the preview and adjust its settings. You can switch tools and revise your changes until you close the image. Editing happens on your device.
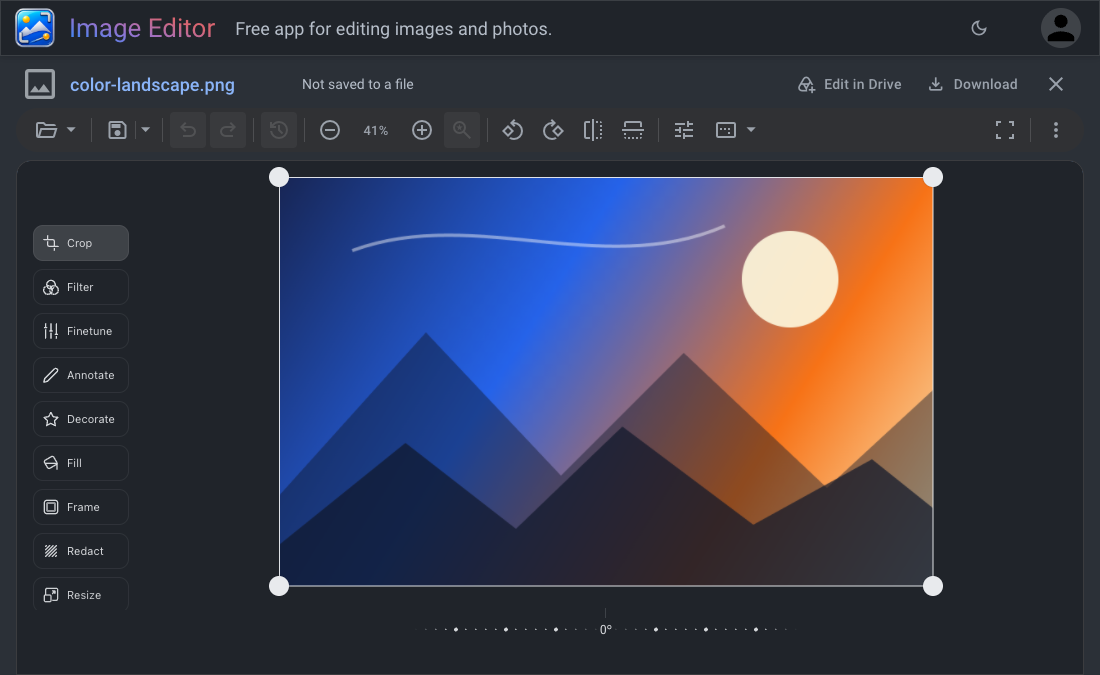
A tour of the toolbar
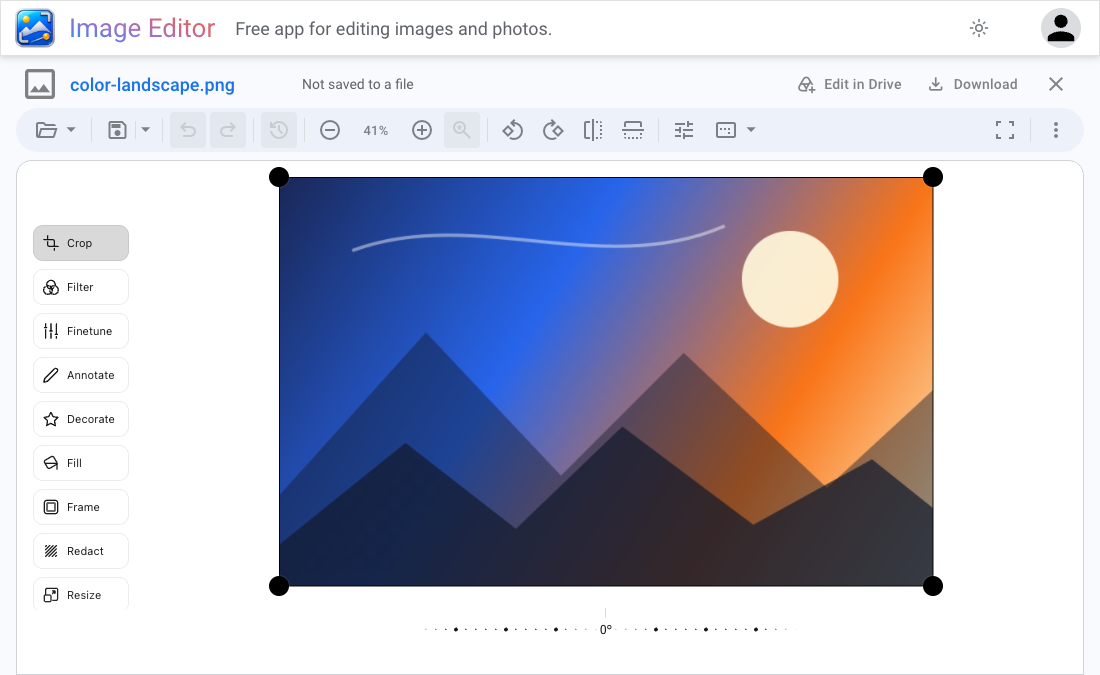
The menu bar groups commands under File, Edit, View, Tools, and Help. The toolbar gives you quick access to Save, Save as..., Download, Undo, Redo, and Revert all changes. For Google Drive images, the File menu also includes copy, sharing, and folder commands. See Google Drive commands.
Use the zoom buttons, choose a percentage, or select Fit to view. Rotate and flip with the toolbar controls. In Transform, choose an Aspect ratio such as Square (1:1) or Widescreen (16:9), then drag the crop handles. On a touch screen, use two fingers to pan and zoom.
Choose Full screen for more editing space. Hide or show the menu bar with the Menu button. Click the filename to rename it. The app bar also has Edit in Drive or Share, Download, and Close image. Open Help for support and keyboard shortcuts.
Use Ctrl+O to open, Ctrl+S to save, Ctrl+Z to undo, and Ctrl+Shift+Z to redo (Cmd on a Mac). With the editor focused, R rotates and +/− zoom. Press Ctrl+/ for all shortcuts.
Photo editing tools
Image
View and zoom your image without changing the crop.
Transform
Crop, rotate, flip, or straighten your image. Choose an aspect ratio, drag the crop handles, then select Apply.
Filters
Try a filter, then adjust its intensity. Choose Original to remove it, or Enhanced to adjust brightness automatically on your device.
Adjust
Choose Auto Adjust to set the sliders for your photo. Move AUTO from its recommended midpoint for a darker or brighter result, or fine-tune any setting. Reset AUTO to restore your previous adjustments.
Markup
Draw or add shapes, arrows, and callouts. Group, align, rotate, or duplicate objects and reuse saved styles.
Text
Add text and adjust its font, size, color, and alignment. Move or rotate it on the image.
Redact
Cover, pixelate, or blur an area. Move or resize regions before saving. Learn about redaction.
Background
Choose a color for transparent areas, or keep them transparent in PNG or WebP. JPEG uses white unless you choose another background.
Frames
Add a border, mat, decorative edge, or Polaroid frame. Adjust its size and color, or choose None to remove it.
Advanced
Correct horizontal or vertical perspective to straighten buildings and other tilted subjects.
Saving, exporting, and image quality
Google Drive images autosave when you have edit access. Local files autosave after your first manual save grants access or sets a destination. Check the status beside the filename.
Save to the current file
Choose Save, or press Ctrl+S (Cmd+S on a Mac). Supported still images can be saved in their original format after the browser grants permission. Drive images save back to Drive when you have edit access.
Save a new file or a separate copy
Use Save as... for a new local file, or Edit in Drive to save and continue in Drive. For a Drive image, File > Make a copy opens a copy in a new tab. Download saves a copy while you keep editing the current file. See saving options.
If the original changed somewhere else
If another app or person changes the file, saving pauses. You can replace that version, load it, or save your edits as a copy. See how to handle conflicting changes.
Working with Google Drive and Gmail
Open an image from Google Drive, edit it, and save it back when you have edit access. Use Edit in Drive to move a local image to Drive. From there, you can share it or use File > Google Drive to move or locate it. Access uses Google's limited drive.file permission.
Open an image attachment from Gmail, edit it, and save a copy to Google Drive or your device.
File formats, conversion, and compression
Open JPEG, PNG, WebP, BMP, GIF, AVIF, HEIC/HEIF, TIFF/TIF, and supported static SVG images. Save as PNG, JPEG, WebP, BMP, static GIF, or single-image TIFF. Some formats require a separate copy; the app explains this when you open the image.
What happens to converted images
Animations open read-only. When a still image is available, the banner lets you edit it as a copy. Multipage TIFF files show one supported image. HEIC/HEIF exports omit features such as HDR and depth data. SVG exports contain pixels rather than editable vectors.
Why converted images need a new file
Some formats contain animation, vector shapes, or other data that a still image cannot preserve. Image Editor saves your edits as a new file to keep the original intact. After saving, you continue in the new file.
Compression and visible quality
PNG preserves every exported pixel but can create larger files. JPEG and WebP usually make smaller photos by discarding some detail. Start with the best source available and avoid repeatedly resaving JPEGs.
Pixels, dimensions, and transparency
More pixels mean more detail, memory use, and file size. Zoom changes the view; Image size changes the saved dimensions. PNG, WebP, BMP, and TIFF can keep transparency. GIF turns partly transparent pixels fully transparent or opaque. JPEG fills transparent areas with white or the color you choose in Background.
Recovery drafts and recent images
Image Editor keeps recovery drafts in this browser when storage is available. They can restore unsaved edits after a reload or crash. Draft saved refers to the draft; your image file still needs saving. See autosave and recovery drafts.
Save work you need to keep
Save files you want to keep. Browser storage can be cleared or run out of space. If recovery is unavailable, save before closing the tab.
Reopen a recent image
Reopen recent images from the start page or File > Open. The list stays in this browser. Removing an entry or clearing the list does not delete your files.
Where your images are processed
Opening, decoding, editing, and rendering all happen locally in your browser. Google Drive actions send the image to or receive it from Google.
Metadata and visible information
Saved images leave out common source metadata, such as location and camera details. Check the image itself for anything you do not want to share, such as addresses or documents.
Very large images
Images need more memory during editing than their file size suggests. If a large image will not open or editing slows down, close other tabs or try a smaller copy.
History of Image Editors
Modern image editors grew out of early experiments with pixels and frame buffers. At Xerox PARC, Richard Shoup's SuperPaint produced its first stable image in 1973. It combined video input with virtual brushes, fills, palettes, shapes, and color controls, ideas still recognizable in the tools we use today.
MacPaint, released with the original Macintosh in 1984, brought raster editing to a wider personal-computer audience. Its mouse-driven tools, clipboard support, and magnified FatBits pixel view helped establish familiar ways to draw, select, copy, and edit one pixel at a time.
Thomas Knoll wrote the program that became Adobe Photoshop in 1987, and he and his brother John developed it until Adobe shipped Photoshop 1.0 for the Macintosh in 1990. Color controls, filters, plug-ins, and layers followed.
GIMP began as a Berkeley student project in 1995 and made its first public release in 1996, bringing advanced editing to a free and open-source community. Editors later moved to phones and web browsers, continuing the broader history of image editing without requiring a traditional desktop installation.
Frequently asked questions
Is Image Editor free, and do I need an account?
Image Editor is free. No account is needed for local files. Sign in only when you use Google Drive.
Does Image Editor change my original automatically?
Yes. Drive images autosave when you have edit access. Local files autosave after your first manual save. Autosave pauses if the file changes elsewhere, and converted images need a new file first.
Where can I learn more or get help?
Read the full FAQ, follow the Help guide, review the Privacy Policy, or email support@imageeditor.app.
Image Editor couldn't load
Try these steps:
See loading help for more options.
- Reload the page.
- Check your internet connection.
- Try a private or Incognito window.
Most extensions are disabled there. - Check browser extensions.
Allow imageeditor.app in any extension that blocks it. - Clear cached files.
Keep site data if you have unsaved recovery drafts. - Update your browser or try another.
Use a current version of Chrome, Edge, Firefox, or Safari.
Still having trouble? Email support@imageeditor.app with the error below.